Create an NLP Language Understanding Bot with Azure Framework SDK C# & .NET {Part 4}

The bot framework enables you to build bots that support different types of interaction with users. Your bot can also have more guided interactions where it provides the users with choices or actions.
The conversation can use simple text strings or more complex rich cards that contain text, images, and action buttons. And, you can add natural language interactions, which let your users interact with your bots naturally and expressively.
In the previous article, Part 3 we learn about the multi-turn bot using card and suggestion actions on how to create a bot to use waterfall dialog, prompt, and component dialog to create a simple interaction that asks the user for general info like name, age, etc.
In this article, Part 4; This bot has been created using Bot Framework, it shows how to create a bot that relies on multiple LUIS.ai and QnAMaker.ai models for natural language processing (NLP).
Use the Dispatch model in cases when:
- Your bot consists of multiple language modules (LUIS + QnA) and you need assistance in routing user’s utterances to these modules to integrate the different modules into your bot.
- Evaluate the quality of the intents classification of a single LUIS model.
- Create a text classification model from text files.
Prerequisites:
- Visual Studio 2019 or later
- Bot Framework SDK v4 Template for C#
- .NET Core 3.1
- Bot Framework Emulator
- Basic knowledge Asp.net Core and async programming language C#
How to Create an NLP Language Understanding Bot? Step by Step Tutorial
Step 1: Download and Install Visual Studio Template using this link .
Step 2: Create a New Project using Echo Bot (.net Core 3.1 Bot Framework v4) Template.

These templates contain all the code that’s necessary to create a bot for the quick start.
Step 3: Start your project now, it will run the default port locally on 3978 looks like this.

Step 4: Download and Install Bot Emulator using this link.
Step 5: A conversation between users and bot involves asking dialog (Prompting) the user for information, parsing the user’s response, and then acting on the information.
For that, we have to create prompt users for information using the different prompt types including in the botbuilder-dialogs library and supported by the SDK. (Learn more about botbuilder-dialogs here ).
This library includes a verity of pre-built prompt classes, including text, numbers, and determines types.
Step 6: Install 2 nugets package for bot builder
- Install-Package Microsoft.Bot.Builder.Dialogs -Version 4.9.4
- Install-Package Microsoft.Bot.Builder.Integration.AspNet.Core -Version 4.9.4
Step 7: Create a folder in solutions name “Bot”, now add a new class “DialogBot.cs” and write below code for declaring class called dialog.
public class DialogBot<T> : ActivityHandler where T : Dialog
    {
        protected readonly Dialog Dialog;
        protected readonly BotState ConversationState;
        protected readonly BotState UserState;
        protected readonly ILogger Logger;
Step 8: Create 3 new functions in dialog bot class which useful for async call and message activity.
public DialogBot(ConversationState conversationState, UserState userState, T dialog, ILogger<DialogBot<T>> logger)
        {
            ConversationState = conversationState;
            UserState = userState;
            Dialog = dialog;
            Logger = logger;
        }
public override async Task OnTurnAsync(ITurnContext turnContext, CancellationToken cancellationToken = default)
{
await base.OnTurnAsync(turnContext, cancellationToken);
// Save any state changes that might have occurred during the turn.
await ConversationState.SaveChangesAsync(turnContext, false, cancellationToken);
await UserState.SaveChangesAsync(turnContext, false, cancellationToken);
}protected override async Task OnMessageActivityAsync(ITurnContext<IMessageActivity> turnContext, CancellationToken cancellationToken)
{
Logger.LogInformation("Running dialog with Message Activity.");
// Run the Dialog with the new message Activity.
await Dialog.RunAsync(turnContext, ConversationState.CreateProperty<DialogState>(nameof(DialogState)), cancellationToken);
}Step 9: Create a new class Botservice.cs and add a service method for each dialog interaction.
public BotServices(IConfiguration configuration)
        {
            var luisApplication = new LuisApplication(
                configuration["LuisAppId"],
                configuration["LuisAPIKey"],
               $"https://{configuration["LuisAPIHostName"]}.api.cognitive.microsoft.com");

            var recognizerOptions = new LuisRecognizerOptionsV2(luisApplication)
            {
                IncludeAPIResults = true,
                PredictionOptions = new LuisPredictionOptions()
                {
                    IncludeAllIntents = true,
                    IncludeInstanceData = true
                }
            };
            Dispatch = new LuisRecognizer(recognizerOptions);
            SampleQnA = new QnAMaker(new QnAMakerEndpoint
            {
                KnowledgeBaseId = configuration["QnAKnowledgebaseId"],
                EndpointKey = configuration["QnAEndpointKey"],
                Host = configuration["QnAEndpointHostName"]
            });
        }
Step 10: Now add a few steps in the startup file
public void ConfigureServices(IServiceCollection services)
{
services.AddControllers().AddNewtonsoftJson();
// Create the Bot Framework Adapter with error handling enabled.
services.AddSingleton<IBotFrameworkHttpAdapter, AdapterWithErrorHandler>();
// Create the bot services (LUIS, QnA) as a singleton.
services.AddSingleton<IBotServices, BotServices>();
// Create the bot as a transient.
services.AddTransient<IBot, DispatchBot>();
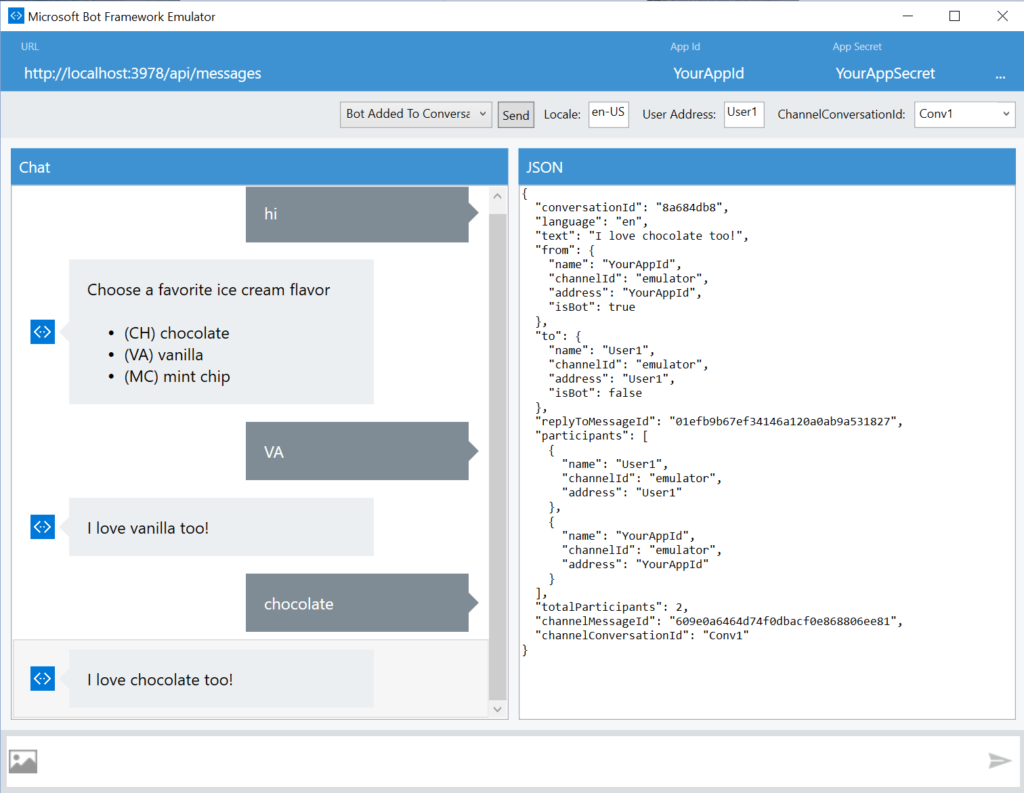
}Step 11: Now, your welcome User Bot is ready just run the project and emulator.

Click on the open Bot button & enter URL http://localhost:3978/api/messages then press on the connect button.


Conclusion is, Once you are comfortable with the concepts presented in this sample, you may want to configure Dispatch using a CLI tool. Dispatch CLI is a CLI tool that enables you to create a dispatch NLP model across the different LUIS applications and/or QnA Maker Knowledge Bases you have for your bot.
If you’re looking for skilled Azure NLP Bot Developers or NET Developers, Contact us to discuss more.
RELATED READ
I work as a Sr. Software Developer at Samarpan Infotech with the latest technologies & taking responsibility for architectural systems research and development. A result driven professional, articulate & analytical senior software developer who build while(noSuccess){ tryAgain(); } solutions, having expertise in software & database architecture planning and designing.