WooCommerce Store Development: Everything You Need To Know

If you are planning to create your WordPress WooCommerce store setup from scratch, then you can employ the highly scalable services of a reputed company in your area. You will get assistance in developing an online store by using advanced WooCommerce development and technology.
You can get a basic website if you are starting from zero from WooCommerce.com. If you already have a WordPress.com website or a self-hosted one with a Business plan, then you can visit the plugins section of your dashboard to search, add and activate plugins for your WooCommerce store. In this blog, we will discuss all the vital things related to setting up a WooCommerce store.
Vital Factors to consider while setting up any online store
Following are some important things that you should consider while setting up an online store:
- Selection of Right Products/Services
- Know Your Target Audience and their demand
- Credit Card processing
- What and How Much to Sell or Invest?
- Who are your competitors?
- Inventory management
- Order Tracking
- Shipping Management
- Returns Management
- Support/Maintenance/Upgrades
- Store Security
- Future Growth
- Testing
- Deployment
How to manage inventory of your online store?
Inventory management is a crucial part of any online store. With the help of plugins, you can streamline the process to get expected results without wasting time. From getting real-time data for available products, automation of order placement to receiving alerts for low quantity products alerts, inventory management will become an easy task to manage with the help of plugins. You can sync your store’s inventory for any number of warehouse or sales channels.
With the help of a built-in system, you can easily manage the inventory of a WooCommerce store. To track inventory, you can need to select Enable Stock Management given in the Products Inventory Settings. In case, if you don’t select this feature, then you will not be able to view the status of the stock in the Product Inventory box.
Firstly, you need to add products that fall into these categories: Simple, Variable, Grouped and External/Affiliate.
You can also make settings for upsells and cross-sells. It simply means that your customers would be displayed these linked products by WooCommerce inventory management when they are shopping from your online store.
How to optimize images and product visuals?
To speed up your online store, it is important to consider product optimization. We will optimize product images, 3D visuals and other such information for users & search engines. Product images should be saved in the correct format. Resize images and save them for users. After this, product images will be run through an image compressor.
If you own an online store, then it is very crucial to pay attention to product images, visuals, etc. as it plays an important role in selling products. We will carry out the following tasks for product optimization:
- Reduce image files as much as possible while retaining their image quality.
- Will display product images of your web store from different viewpoints (360 spins).
- Optimize the loading speed of product images to improve the speed of your online store and will help you to convert your store traffic into sales.
- Optimize images for mobile devices and other devices.
- Enable responsive imaging for products in the plugin settings automatically serve resized images that perfectly fit your user’s screen. It will save bandwidth and result in faster loading of pages.
How to create Coupon Code on your online store?
Offering discounts and coupon codes are one of the great ways to entice new customers and get loyal customers visit back to your online store. WooCommerce has powerful coupon code functionality, which lets you allow offer coupons with WooCommerce store in just few clicks.
When it comes to coupon code implementation, you can easily create coupon codes using basic WooCommerce tools.
Visit WooCommerce>Marketing>Coupons. If it’s your first time in creating coupons, then you will see below screen.

Whereas, if you have an existing store with coupons created in it, you will be able to view list of coupons created as shown below:
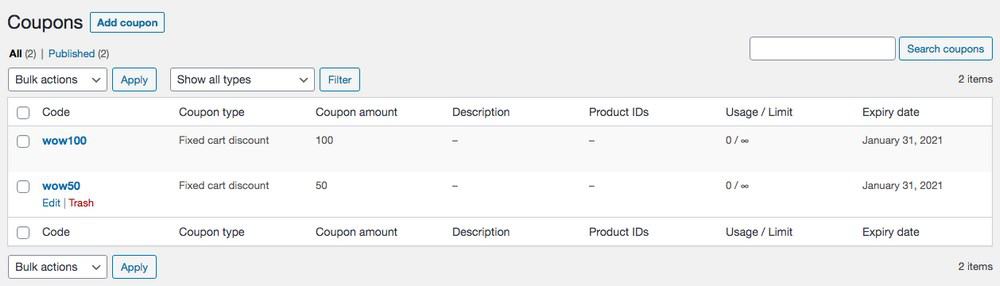
For creating new coupon, you need to click on “Create your first coupon” or Add coupon button.
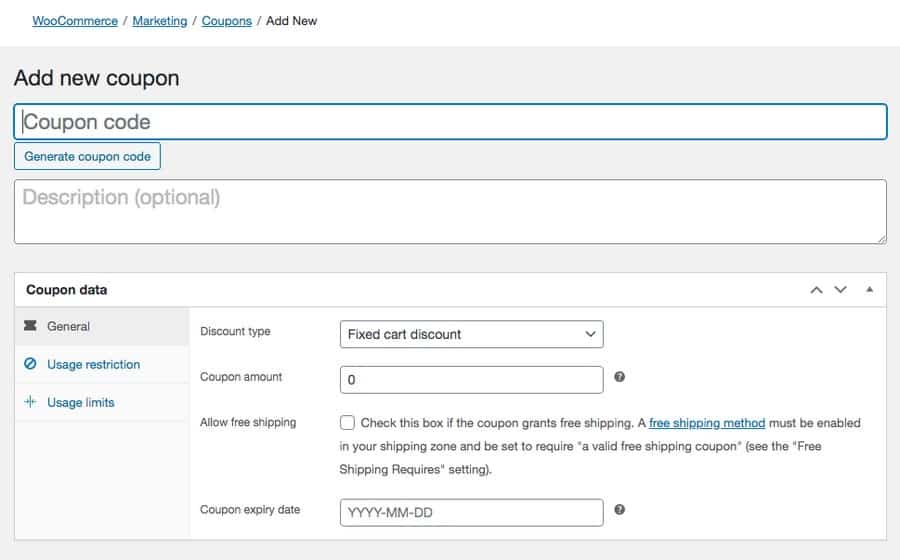
Give unique and creative names to your coupon code. For instance, if you are creating coupon codes for Christmas in 2021, then you can create names like CHR2021, CHRISTMAS2021, XMAS2021, etc. If you wish, you can also create system generated codes. For this, you need to click ‘Generate coupon code’. After creating code, you need to check out General, Usage restriction and usage limits tabs.
In the General tab, you can decide the type of discount you want to offer to your customers.
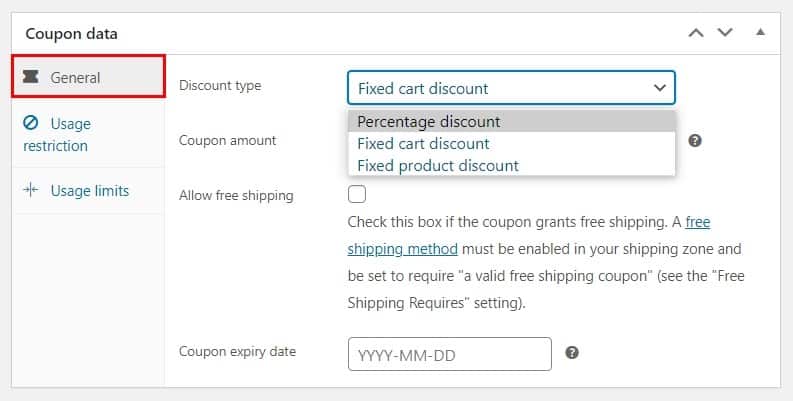
Next, you need to decide its value which can be either a fixed number or percentage. Additionally, you can also provide FREE shipping and an expiry date for the coupon code.
For Usage restriction tab, you can set various restrictions on the usage of coupon.
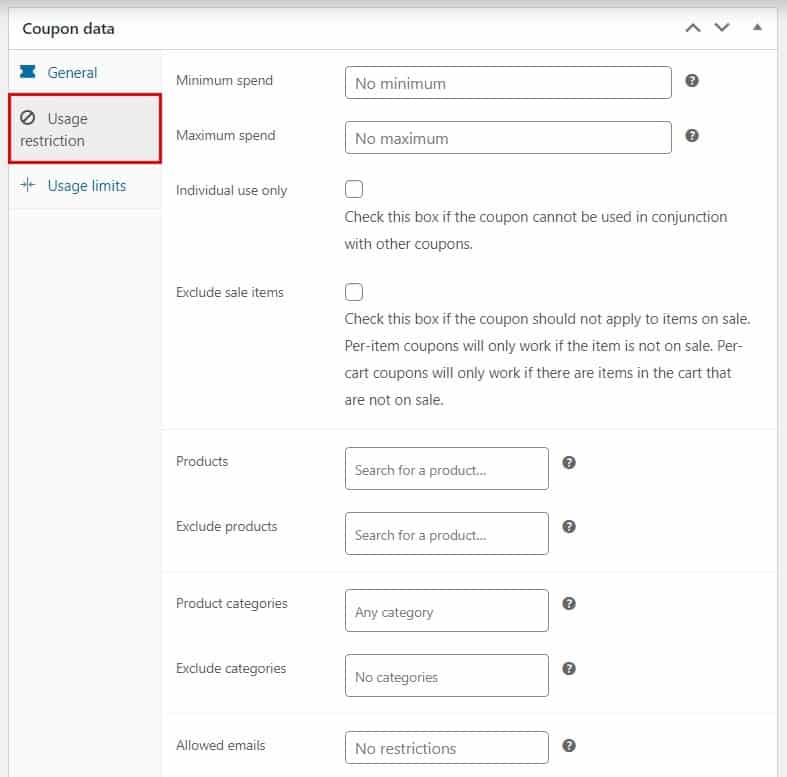
For instance: you can set minimum spend, maximum spend, include or exclude products/categories for which the coupon is applicable.
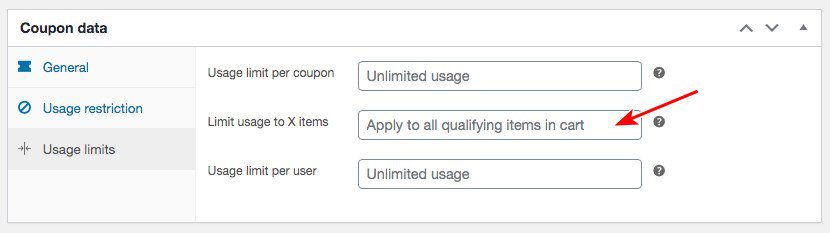
The Usage limits tab is the number of times the coupon can be redeemed. In it, you can find usage limit per user which describes the number of times a user can redeem the coupon.
Know how to Validate Zip Code in your WooCommerce store
Shipping forms a vital part for any online store development. If you own a WooCommerce online store, then you can configure different shipping zones, methods, options and classes. When placing orders, customers usually like to know about the timeline of their orders.
With the use of Advance Check Pin Code plugin, you can let your customers know about delivery date of your products, before they go ahead and buy the product. This proves helpful in reducing cart abandonment rates and helps in increasing customer satisfaction rates. Check Zip code for Shopping WooCommerce is helpful in checking whether shipping is available in a particular zip code or postal code.
Why to Consider Payment Gateway Integration into your online store?
We will help you enjoy smooth shipping and payment processing for your online store. With successful integration, you can automatically process orders and receive LIVE updates about your store’s orders with our integration services.
WooCommerce supports different payment gateways like Stripe, PayPal, RazorPay, etc. through its extensions. These are plugins that help in integration of those payment services into your WooCommerce checkout process. In case, if you choose payment gateway which is “out of the box”, then it requires some sort of custom programming in order to function properly. You can integrate payment gateways for free or as premium upgrade using gateway plugins designed for WooCommerce.
With payment gateway integration, your customers can make the payment directly on your store and can experience a seamless checkout procedure. The good part is that their payment information remains protected and secured. Additionally, you can manage the whole payment thing right from the dashboard you are already familiar with. You can anytime view payments, issue refunds, track cash flow and other such things directly on your store.
Why should you consider Multiple Payment Gateways?
- Not everyone will use same payment gateway. So therefore, you should provide options for buyers.
- You might lose on your small or big sale in case if the buyer is not able to operate on single payment gateway set by you.
- If in case single payment gateway doesn’t function properly or breaks down, then in this situation WooCommerce payment gateways can be a savior.
Adding WooCommerce payment gateway to your online store is easier than adding a plugin to your store:
- Download your preferred WooCommerce payment gateway
- Go to the backend of your online store. Go to Plugin>Add New>Upload>Choose file
- Click Install Now>Activate
- Lastly, configure WooCommerce payment gateways setting as per your store’s needs
Our team will help you to integrate WooCommerce payments so that you get exceptional custom payment gateway solution. You can select best WooCommerce payment gateways for your store and check out our payment integration services as well.
Consider Store Security for Safety of Your Customers
Security remains a critical pillar of any online store. Therefore, if you own an online store, then you need to consider it on a serious note. When it comes to store security, we will take the best care of this aspect too! We do this by installing SSL certificates, security plugins and lot more.
We will optimize your online store and make it fully secure from undesired attacks and intrusions. We will create the groundwork for your online store, which will remain protected from unwanted attacks. At regular intervals of time, we will run well-structured quality tests and security audits in order to fix bugs (if any), safeguard your data and enhance your store performance.
To ensure that your WooCommerce store is secure, you need to consider below mentioned essential security practices:
- Select a reputable and reliable host
- Create strong and unique password
- Prevent brute force attacks
- Enable 2 factor authentication (2FA)
- Make use of high-quality plugins
- Add SSL certificate
- Add extra protective layer to your site
- Review and adjust your FTP settings
- Keep your site updated
- Create backup of your store regularly
How to integrate WooCommerce Store Products to Google Shopping, Amazon, eBay, Walmart store
In order to increase your WooCommerce store sales, you can consider multi selling on different marketplaces like eBay, Amazon, Walmart, etc. This can be done by integrating your online store with different marketplaces.
For this, you need to generate a WooCommerce feed and uploading the same on those respective websites. With the help of Product Feed Manager, you can generate product feed for different merchant shops in seconds. This plugin comes configured with pre-defined templates designed for every merchant so that feed can be generated in just few clicks.
To synchronize WooCommerce store products with different marketplaces, you need to follow below mentioned steps:
- In order to set import and export points from your online store, you need to click on required channels and at the bottom of the screen, there would be a small window, select required option – either to import/export depending on your needs.
- For instance: To connect WooCommerce with Amazon, you need to drag and click first export and then import points. You will be then asked for credentials for both the sales channels. (Do it for other marketplaces too.)
- You can then download products from WooCommerce and then send it to Amazon. (Do it for other marketplaces too.)
- Then create mapping rules and select products for uploading them to new sales channel.
- Next, choose payment, billing and shipping methods.
- Also, it is essential to set appropriate sync intervals and then start selling your store products on different channels simultaneously.
Another way is to make use of Multichannel for WooCommerce, a Google channel, which serves the function of a marketplace listing tool and is a fully-featured multichannel solution. It comprises of real-time inventory feature and syncs pricing from WooCommerce. It powers Google, eBay, Walmart and Amazon integration and you can easily connect your store to all the global marketplaces and sales channels from WooCommerce.
This gives you complete control of Amazon, Google, eBay, Walmart, etc. It also helps in preventing overselling and allows you to efficiently manage inventory for all sales channels.
It’s striking features:
- Integration with global marketplaces and sales channels with inbuilt currency control
- Supports WooCommerce store currencies
- Create new or link existing marketplace listings in bulk
- 100% real-time sync of product details, inventory, pricing and orders
- It supports use of channel related specific product details, product descriptions, titles and pricing
- Help in creating buy on Google listings and product listing Ads for Google Shopping, Google Search, Google Display Network, YouTube and more surfaces on Google.
4 Steps to Create WooCommerce Google Shopping Ads
By creating Google Shopping Ads, you can create visibility for your products right in front of more and more users. You can expect high amount of exposure than compared to traditional SEO when you integrate WooCommerce with Google Shopping. This will result in increased exposure to your products and drive more sales too!
The first step to setting up WooCommerce Google Shopping ads involves:
Setting up a Google Merchant Center Account:
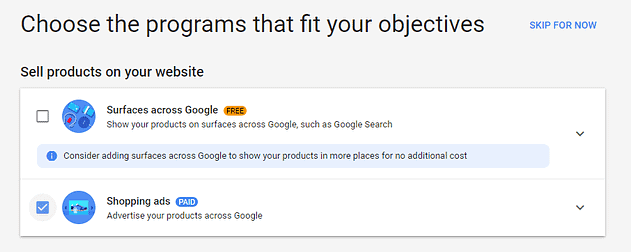
To create an account on Google Merchant Center, you need to furnish some basic details regarding your business. Once you are done with it, then select Shopping ads option in the section choose the programs that fits your objectives.
Importing WooCommerce products data to Merchant Center:
You can import your products either using plugin or manually by creating spreadsheet consisting of links to your product pages.
Configuring your shopping campaign in Google Ads connected to your Merchant Center Account:
Let’s assume that your WooCommerce product is already there in the Merchant Center and you are all set to launch a fresh ad campaign.
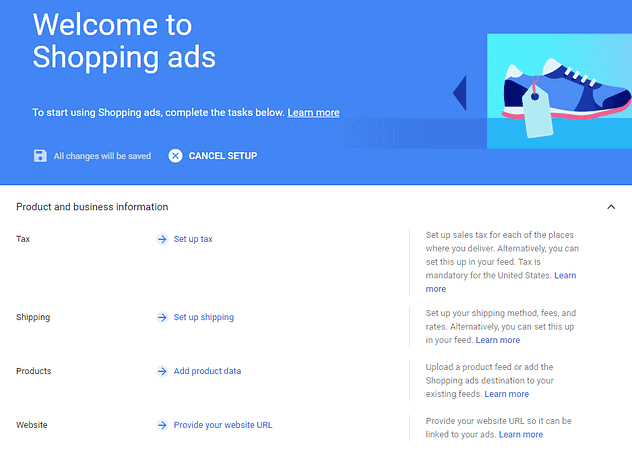
Take a look at Merchant Center dashboard and under pending tasks, you need to hit Continue button. Then on the next screen, you will see what products you want to get displayed, accordingly set up shipping and tax information and other such pertinent details.
If you are setting up first campaign, then you would be required to configure several individual settings. To ensure that you set up campaign without any errors or pertinent information, it is recommended to check suggestions for each setting and also refer to Google’s guidelines.
In-depth understanding of product and website Google policies for approval of your campaign: You should have detailed knowledge of products and Google website policies in order to get approval for your campaign. This will help you to increase chances of your campaign’s approval.
If you wish to avail professional store development services, then you can consider our services. We provide assistance in building, customizing and implementing WooCommerce development services that range from designing, developing to integrating payment, thereby catering to your tailored Ecommerce needs. Having years of experience in this industry, we believe in offering customized user experience and create a unique presence for your WooCommerce Store.
Wrapping Up
To conclude, if you are don’t know how to set up WooCommerce storefront, then we will make WooCommerce Store Development easy for you with our WordPress WooCommerce Integration service experts. Once the store is ready, you can then start selling your products on multiple platforms and channels.
Why trust us for WooCommerce Store Development?
- Affordable development cost
- Multi-browser compatibility
- Proficient and skilled team of designers & developers
- On-time delivery
- Agile methodologies
- 100% customer satisfaction
The web solutions offered by Samarpan Infotech are driven by agile methodologies and fulfill your ever-growing business needs. Our seasoned team of WooCommerce designers and developers fully dedicated to develop attractive online stores using this technology.
>>More: How to Optimize Your WordPress Website for Mobile Users
I am Sr. WordPress Developer at Samarpan Infotech. I love to optimize code because I believe in "An average developer can write code that a computer can understand. But Passionate programmer write code that humans can understand".


